

I'm going to start a series of more columns dedicated to drawing and illustrating with Photoshop.
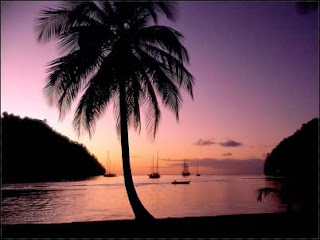
Step 1: Start out with a reference photo. Try to pick something easy at first. Its somewhat hard to explain but try to visualize what this picture will look like if it were vectorized. I thought that since much of this photo was black it would be a good candidate. If you don't have a photo to use, go and download the finished PSD file from my website if you want to follow along.
Step 2: Now that we have our photo, its time to start tracing. We're going to use the pen tool for this. In case you haven't noticed, I've been pushing you in many tutorials to use the pen tool. Hopefully some of you have been successful. I firmly believe that if you can master the pen tool and path creation/manipulation that you will open up a whole new set of possibilities with your digital artwork. So, now you're ready. Select the
Pen tool (P). Make sure that the "Shape Layers" option is selected in the top option bar (It looks like this ). This will automatically create a new layer when you start. Set black as the foreground color and trace around the left mountain and trees. Trace all the way around until you close the path. I've made my color red so you can easily see what I've traced. Quick note: You don't need to be perfect. I only spent about a minute
tracing this.

Step 3: Now do the same thing for the right side. Its OK if you go outside of the boundaries of the canvas on this as the shape layer will only show what is inside the image boundary.

Step 4: Then create the beach in a similar way.

Step 5: Next we're going to create a custom gradient for the sky. Select the gradient tool and then click on the gradient preview area in photoshops top option bar. This should bring up the gradient editor. Double click on the right most color stop to bring up the color picker. Now move the eyedropper over the dark purple in the top right of the image. Add several more color stops along the gradient and set their color values to
various colors between the top right and bottom left of the image. See my images below for help if needed.


Step 6: Now that we have our new gradient we need to create the sky. Make a new layer under the first two and make a rectangular selection like I have here.

Step 7: Select the gradient tool and the new gradient that you just created. Set the gradient type to radial. Drag from the bottom left to the top right. See my image here to see what yours should look like so far.

Step 8: Now create another layer and one more rectangular selection for the water. Drag the same gradient in the direction shown in my screenshot here. You may have to drag it a few times to get it right.

Step 9: OK, we're moving along. The next step is to create the palm tree. To do this create a copy of your master photo layer. With that new layer active go to Image->Adjustments->Threshold. Enter 55 for the Threshold Level. Your image should look similar to this.

Step 10: Grab your lasso tool and quickly select all of the black areas and fill them with white. Once this is done hit Ctrl+I to invert the colors.


Step 11: Then select all (Ctrl+A) and copy that layer. Go to your channels palette and paste it into a new channel. Ctrl + click on that channel to select everything that is white. Go to your layers palette again (make sure you don't deselect yet) and create a new layer on top of all of the others. Fill the selection with black. You should have your palm trees now.
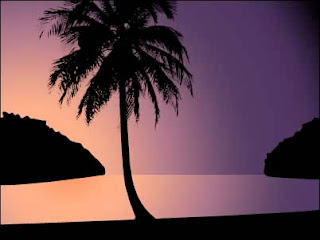
Step 12: That's pretty much it. Add a couple of small boats in a similar way. Just grab the pen tool and trace away. Also, you're not limited to just recreating the same picture with the same colors. Its very trendy to use a limited set of colors and create gradients in your objects. Use your imagination. All I did to the second picture below is add some gradient overlay layer styles as well as a 1 pixel purple stroke. It was very easy to change and the great thing about using the pen tool and shape layers for this is that we can scale it to any size we want without loosing quality.


Step 1: Start out with a reference photo. Try to pick something easy at first. Its somewhat hard to explain but try to visualize what this picture will look like if it were vectorized. I thought that since much of this photo was black it would be a good candidate. If you don't have a photo to use, go and download the finished PSD file from my website if you want to follow along.

Step 2: Now that we have our photo, its time to start tracing. We're going to use the pen tool for this. In case you haven't noticed, I've been pushing you in many tutorials to use the pen tool. Hopefully some of you have been successful. I firmly believe that if you can master the pen tool and path creation/manipulation that you will open up a whole new set of possibilities with your digital artwork. So, now you're ready. Select the
Pen tool (P). Make sure that the "Shape Layers" option is selected in the top option bar (It looks like this ). This will automatically create a new layer when you start. Set black as the foreground color and trace around the left mountain and trees. Trace all the way around until you close the path. I've made my color red so you can easily see what I've traced. Quick note: You don't need to be perfect. I only spent about a minute
tracing this.

Step 3: Now do the same thing for the right side. Its OK if you go outside of the boundaries of the canvas on this as the shape layer will only show what is inside the image boundary.

Step 4: Then create the beach in a similar way.

Step 5: Next we're going to create a custom gradient for the sky. Select the gradient tool and then click on the gradient preview area in photoshops top option bar. This should bring up the gradient editor. Double click on the right most color stop to bring up the color picker. Now move the eyedropper over the dark purple in the top right of the image. Add several more color stops along the gradient and set their color values to
various colors between the top right and bottom left of the image. See my images below for help if needed.


Step 6: Now that we have our new gradient we need to create the sky. Make a new layer under the first two and make a rectangular selection like I have here.

Step 7: Select the gradient tool and the new gradient that you just created. Set the gradient type to radial. Drag from the bottom left to the top right. See my image here to see what yours should look like so far.

Step 8: Now create another layer and one more rectangular selection for the water. Drag the same gradient in the direction shown in my screenshot here. You may have to drag it a few times to get it right.

Step 9: OK, we're moving along. The next step is to create the palm tree. To do this create a copy of your master photo layer. With that new layer active go to Image->Adjustments->Threshold. Enter 55 for the Threshold Level. Your image should look similar to this.

Step 10: Grab your lasso tool and quickly select all of the black areas and fill them with white. Once this is done hit Ctrl+I to invert the colors.


Step 11: Then select all (Ctrl+A) and copy that layer. Go to your channels palette and paste it into a new channel. Ctrl + click on that channel to select everything that is white. Go to your layers palette again (make sure you don't deselect yet) and create a new layer on top of all of the others. Fill the selection with black. You should have your palm trees now.

Step 12: That's pretty much it. Add a couple of small boats in a similar way. Just grab the pen tool and trace away. Also, you're not limited to just recreating the same picture with the same colors. Its very trendy to use a limited set of colors and create gradients in your objects. Use your imagination. All I did to the second picture below is add some gradient overlay layer styles as well as a 1 pixel purple stroke. It was very easy to change and the great thing about using the pen tool and shape layers for this is that we can scale it to any size we want without loosing quality.


very nice blog..........
ReplyDeleteNice work thank for sharing,,,
ReplyDeleteBeautiful these vector illustration, Amazing .
ReplyDeleteVery effective tutorials for learning Illustrator. Thanks for sharing the tutorial.
ReplyDeleteExcellent post. I am really so glad to be here for this post. Thanks
ReplyDelete