Tuesday, August 31, 2010

Outputting Multiple Linked Web Pages

Take advantage of a hidden output feature in ImageReady that allows you to generate multiple page layouts that are automatically linked together, complete with rollovers, and ready to put on line.

1.
Open a Layered File in ImageReady

Buried deep in ImageReady's Output Settings is a little-known checkbox labeled Output Multiple HTML Files. This feature works in conjunction with the Selected rollover state to create multiple linked files with rollover navigation. In this project you'll use these features to make four pages for a Web site in a single file. Each page has rollover buttons programmed with the Selected state and remote rollovers that change the content of the page. If you want to learn more about making remote rollovers, review Pointers and Remote Rollovers in previous tutorial. If you're eager to see what we have in store for you here, dig right in.


TIP

Automatic Palette Arrangement. ImageReady comes with some default palette arrangements. A quick way to open and arrange the palettes you'll use when you're making rollovers is to choose Window>Workspace>Inter-activity Palette Locations. This opens the Web Content palette, the Layers palette, and the Slice palette all neatly arranged on your screen.

We made this file in Photoshop, including lots of layers with the artwork for four Web pages. Open the file in ImageReady. Choose View>Show>Layer Edges if you want to turn off the distracting blue box that identifies the boundaries of a selected layer's contents.
2.
Change the Slice-Naming Default

You'll be using lots of slices in this project, so take a minute to make the automatic slice names shorter and more meaningful. Choose File>Output Settings>Slices. In the Default Slice Naming area of the Output Settings dialog box A, click the arrow on the first menu and choose layer name or slice no. Click the arrow on the second menu and choose none. Click the arrow on the third menu and choose none. Click OK.


TIP

Custom Slice Naming. If you change ImageReady's slice naming convention, you can save your changes for future use by clicking the Save button in the Output Settings dialog box and giving your custom setup a name. That name will appear in the Preset menu at the top of the dialog box the next time you choose File>Output Settings>Slices.

Slice the Markers

First, you'll slice the navigation markers that will tell your audience which page they're viewing. In the Layers palette, click the arrow to the left of the Markers layer set to open that layer set. Click in the Visibility field of each of the layers in the set A to make all the markers visible in the document window. Select all the marker layers by clicking on the JourneyMarker layer, holding down the Shift key, and clicking on the TreasureMarker layer B. Now choose Layer>New Layer Based Slices from the menu bar at the top of the page. This makes a slice around each marker C.

Slice the Page Text

Now you'll add one big slice around the area that will contain different text on each page. This area must be sliced because it will be a target of the remote rollovers you'll be creating. In the Layers palette, click the arrow to the left of the Text layer set to open that layer set. Click in the Visibility field of each layer in that layer set A to make all the text layers visible, one on top of the other. Select the Slice tool in the toolbox and draw a slice that's big enough to encompass all of the text B.

Slice the Text Links

Now you'll add a slice and add a rollover state to each of the text links—all in one step. In the Layers palette, click the arrow to the left of the Links layer set to open that layer set. Click on the JourneyLink layer, hold down the Shift key, and click on the TreasureLink layer to select all the layers in the layer set A. Open the Web Content palette (Window>Web Content), and click on the Create Layer-Based Rollover icon at the bottom of the Web Content palette B. The Web Content palette now lists each of the text link slices with an Over state indented beneath it C. You'll change each of the Over states to a Selected state later in this project.
 
 
Set Up the Normal State

Now that you've finished slicing, you'll set up the Normal state of the document—the way it will look when it first loads in a viewer's Web browser. In the Layers palette, click in the Visibility fields A, B of each of the following layers to turn off the Eye icons and make those layers invisible in the Normal state:


  • LegendMarker
  • ShipMarker
  • TreasureMarker
  • LegendText
  • ShipText
  • TreasureText
7.
Set Up the Selected States

Now you'll change the Over state of each text link slice to a Selected state. Double-click on the Over state of the JourneyLink slice in the Web Content palette A. In the Rollover State Options dialog box that opens, choose Selected B. Then check Use as Default Selected State C, so that the journey link is in the Selected state when the site loads in a viewer's Web browser.


INSIGHT

Selected State. The Selected state of a rollover link is triggered by a click. It keeps the current image in view until the viewer clicks another link that's programmed with a Selected state. The Selected state is useful for rollover buttons, where it can be applied to keep one button differentiated from the others so a viewer knows which page he is on.


Repeat this step on each of the other text link slices—the LegendLink slice, the ShipLink slice, and the TreasureLink slice—except that for these three slices be sure to uncheck Use as Default Selected State in the Rollover State Options dialog box.
 

Complete the Journey Page

Each of the four pages in the site you're building will appear on the Selected state of one of the four text links. In the following steps you'll construct each page by changing its appearance on the Selected state of the corresponding text link. There are no changes to be made to the appearance of the journey page, which loads first into a viewer's browser. However, there is one small, but important technical change to be made to the Selected state of the JourneyLink slice.

Click on the Selected state of the JourneyLink slice in the Web Content palette A. Then click on the spiral icon to the left of that Selected state B and drag to the slice around the remote text in the image C. Do this again, dragging to the slice around the journey marker in the image D. This step is necessary to make the remote changes work when a viewer is on another page in the site and clicks on the journey link.


Create the Legend Page

Now you'll change the appearance of the legend page. Click on the Selected state of the LegendLink slice in the Web Content palette A. In the Layers palette, click in the Visibility field of the JourneyMarker layer to turn off its Eye icon. Click in the Visibility field of the LegendMarker layer to add an Eye icon B.

In addition, click in the Visibility field of the JourneyText layer to turn off its Eye icon and click in the Visibility field of the LegendText layer to add an Eye icon there C. Then, in the Web Content palette, click on the spiral icon to the left of the Selected state of the LegendLink slice and drag to the remote text slice in the image D. Do this again, dragging to the slice around the Legend marker in the image E. In the image, a marker appears to the left of the legend text link and text about the legend appears in the remote slice.


Create the Ship Page

Next you'll change the appearance of the ship page. Click on the Selected state of the ShipLink slice in the Web Content palette A. In the Layers palette, click in the Visibility field of the JourneyMarker layer to turn off its Eye icon and click in the Visibility field of the ShipMarker layer to add an Eye icon B.

Then click in the Visibility field of the JourneyText layer to turn off its Eye icon and click in the Visibility field of the ShipText layer to add an Eye icon C. In the Web Content palette, click on the spiral icon to the left of the Selected state of the ShipLink slice and drag to the remote text slice in the image D. Repeat this, dragging to the slice around the ship marker in the image E. In the image, a marker appears to the left of the ship text link and text about the ship appears in the remote slice.


Create the Treasure Page

Now you'll change the appearance of the treasure page on the selected state of the TreasureLink slice. Click on the Selected state of the TreasureLink slice in the Web Content palette A. In the Layers palette, click in the Visibility field of the JourneyMarker layer to turn off its Eye icon and click in the Visibility field of the TreasureMarker layer to add an Eye icon B.

Then click in the Visibility field of the JourneyText layer to turn off its Eye icon and click in the Visibility field of the TreasureText layer to add an Eye icon there C. In the Web Content palette, click on the spiral icon to the left of the Selected state of the TreasureLink slice and drag to the remote text slice in the image D. Do this again, dragging to the slice around the treasure marker E. In the document window, a marker appears to the left of the treasure text link and text about the treasure appears in the remote slice. You're now finished creating the pages. Click the Preview in Browser button in the toolbox and try out each text link in the browser.


Save Multiple Linked Pages

This is the secret to saving multiple pages with automatically created links. Choose File>Output Settings>Saving HTML Files. In the Output Settings dialog box, check Output Multiple HTML Files A and click OK.


CAUTION

File Structure. The links between the HTML pages ImageReady created depend on the relative location of the HTML files and image files. You can move all the files together (for example to upload them to a server), but don't move the individual files or put them into different folders or the links will break.

We optimized the image for you. So just choose File>Save Optimized As. In the Save Optimized As dialog box B, set Format/Save As Type to HTML and Images, create a new folder, and click Save. Click OK at the file name warning. The output folder on your hard drive contains four HTML pages and a folder of images. You have a whole site of linked pages ready to upload to a Web server!
In this tutorial:
  1. Automation
  2. Batch Processing Photo Thumbnails
  3. Making the Most of Actions
  4. Making Multiple Web Graphics
  5. Demystifying Droplets
  6. Preparing Photos for Web with Conditional Actions
  7. Design Multiple Pages in a Single File
  8. Linking HTML Pages from Layer Comps
  9. Outputting Multiple Linked Web Pages
  10. Creating Dynamic Flash Web Banners
  11. Creating and Importing External Data Sets

Linking HTML Pages from Layer Comps

The last project, Designing Multiple Pages in a Single File, explained how to produce multiple Web pages using layer comps and slice sets. But the pages ImageReady generates from layer comps are not automatically linked together. If you want to link the resulting pages to one another you have to do some advance planning, as we explain here.

TIP

.HTML vs. .HTM. When you're naming HTML files for the Web you can append either of two extensions—.html or .htm. Both mean the same thing. However, you must use the same extension on your page names and in the links to those page names. Photoshop and ImageReady apply the .html extension by default.
In order to create links between the HTML pages generated by the layer comps you made in the last project you have to know two things in advance—the name of each HTML file and where it will be saved. This will allow you to create relative links between the files.
First let's talk about file names. In the last project you saved each HTML file with its default file name. If you look in your output folders you'll see that ImageReady named each HTML file with the same name, C03_04_cleaner.html, which it took from the name of the PSD source file. If you're going to link the pages together, each page will have to have a unique name. You can take care of that by typing a unique name into the Name field of the Save Optimized As dialog box when you save each file. But you'll have to know the names you're going to give each file in advance so you can create links before saving. Let's say you'll name the files hues.html, colors.html, shades.html, and home.html.
Now let's plan where you're going to save each file. Assume you'll save each HTML page into a separate folder, each of which is located in the same folder/directory on your hard drive, and that those folders will be named hues folder, colors folder, shades0 folder, and home folder.
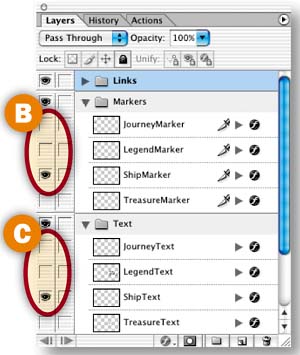
Now you have the information you need to create the links. Click in the Apply Layer Comp field to the left of the Colors layer comp. In the Web Content palette, select the ColorsMarker slice in Slice Set 1. Choose Window>Slice to open the Slice palette. In the URL field of the Slice palette, type ../colors/colors.html. This means go up one level, look for the colors folder, and then go down one level to find the file colors.html. Repeat this on the HuesMarker slice (../hues/hues.html) and on the ShadesMarker slice (../shades/shades.html). If you want to link back to the home page, you'll have to add an extra slice to the image (perhaps around the silver button at the top right of the image), and type ../home/home.html in the URL field for that slice. Now save each layer comp as an HTML file as you did in the last project, but give each file its unique name and save it to the planned folder.
In this tutorial:
  1. Automation
  2. Batch Processing Photo Thumbnails
  3. Making the Most of Actions
  4. Making Multiple Web Graphics
  5. Demystifying Droplets
  6. Preparing Photos for Web with Conditional Actions
  7. Design Multiple Pages in a Single File
  8. Linking HTML Pages from Layer Comps
  9. Outputting Multiple Linked Web Pages
  10. Creating Dynamic Flash Web Banners
  11. Creating and Importing External Data Sets

Designing Multiple Pages in a Single File

Here's an efficient way to design a whole site full of pages in a single file. Use layer comps to create multiple page designs in one file. Then save time by using slice sets to slice pages that are similar.

1.
Open the Layer Comps Palette

Before you start, take a look at the sidebar on this page to learn how you'll use layer comps in this project. Begin in ImageReady with a basic Web page design A. Notice that there are some additional layers in the Layers palette that don't have an Eye icon to their left. These layers are currently not visible in the document window. They'll be used later in the project as you create content for the individual pages in this Web site and record the state of each page as a separate layer comp.


INSIGHT

Using Layer Comps in Web Design. A layer comp is a snapshot of the state of a file's layers. A file can have multiple layer comps, each of which records layers' visibility, position, and appearance at a point in time.

In this project, you'll use layer comps to design multiple pages for a Web site within a single file. The home page has one navigation scheme, and the three inner pages share another navigation scheme. The resulting pages offer several advantages over designing a site's pages one by one:
  • The pages are visually consistent, which is a hallmark of good Web design.
  • You don't have to slice each page separately. Instead, similarly structured pages can share a slice set.
  • You can present all the page designs to a client in one PSD file.


Open ImageReady's Layer Comps palette by choosing Window>Layer Comps. The Last Document State at the top of the palette is a snapshot of the most recent state of the layers in the image. You can return to that state at any time by clicking in the Apply Layer Comp field to the left of the Last Document State B.
2.
Make the Home Page Layer Comp

The home page of the site you're creating will include the artwork that's currently visible in the document window, plus some text links. Click the Eye icon to the left of the TextLinks layer set in the Layers palette A to make the text links visible B.

Now you'll make a layer comp that is a snapshot of this home page design. Click the Create New Layer Comp button at the bottom of the Layer Comps palette C. In the New Layer Comp dialog box that opens D, name this layer comp Home. Check Visibility and Position— the two properties of this layer that you want the program to keep track of. You can type some notes into the Comment field about this layer comp if you wish. Click OK to create the Home layer comp in the Layer Comps palette.

Design the Colors Page

This site has three inner pages—the colors page, the hues page, and the shades page. In this step you'll design the colors page by changing the visibility and position of some of the layers.

Click in the Visibility field of the Buttons layer set in the Layers palette A to display an Eye icon. A set of navigation buttons appears on the left side of the image B. Next, click the arrow to the left of the TopNav layer set C to open that layer set, and click in the Visibility field of the ColorsMarker layer to add an Eye icon there D. A marker appears on the Colors link in the navigation bar at the top of the image E. Finally, select the Move tool in the toolbox and click the Move tool icon in the Options bar F. Select the TextLinks layer set in the Layers palette G. Hold down the Shift key to constrain vertical movement, and drag the text links to the left until they are on top of the buttons B.

Create the Colors Layer Comp

Now you'll make a second layer comp-—a snapshot of layer visibility, position, and appearance in the colors page you just designed.
Click the Create New Layer Comp button at the bottom of the Layer Comps palette A. In the New Layer Comp dialog box B, name this layer comp Colors. Check Visibility, Position, and Appearance. (Appearance includes layer styles, layer blending modes, and layer opacity.) You can type notes into the Comment field if you wish. Then click OK. You'll see a new Colors layer comp in the Layer Comps palette. If you click the arrow to the left of the layer comp C you'll see the comments you entered in the New Layer Comp dialog box.

TIP

Layer Comp Properties. We often leave all three layer properties— Visibility, Position, and Appearance— checked in the New Layer Comps dialog box, even if we're not sure we need to include all of these properties in a layer comp. That way our bases are always covered.

Design the Hues Page

The hues page is another inner page of this site. It is similar in structure and content to the colors page. The only difference is that the Hues marker is visible and the Colors marker is not visible on the hues page A.

To set up the hues page, click in the Visibility field of the HuesMarker layer in the Layers palette to add an Eye icon there. Then click in the Visibility field of the ColorsMarker layer to turn off that Eye icon B.
6.
Create the Hues Page Layer Comp

Now you'll make a layer comp of the hues page you designed in the last step. Click the Create New Layer Comp button at the bottom of the Layer Comps palette A. In the New Layer Comp dialog box B, name this layer comp Hues. Check Visibility, Position, and Appearance, and add a comment if you wish. Click OK to create the Hues layer comp in the Layer Comps palette.

Design the Shades Page

Now you'll design the final page—the shades page, which is another inner page with the same structure as the colors and hues pages. In the Layers palette, click in the Visibility field of the ShadesMarker layer to add an Eye icon there A. Then click in the Visibility field of the HuesMarker layer to turn off its Eye icon B. There's now a marker on the Shades link in the navigation bar at the top of the image C.

Create the Shades Layer Comp

To create a layer comp for the shades page, click the Create New Layer Comp button at the bottom of the Layer Comps palette A. In the New Layer Comp dialog box B, name this layer comp Shades. Check Visibility, Position, and Appearance, and add a comment if you wish. Click OK to create the Shades layer comp in the Layer Comps palette.
 
View the Layer Comps

View each of the layer comps by clicking in the Apply Layer Comp field to the left of each layer comp A. Alternatively, click the Previous and Next icons at the bottom of the Layer Comps palette to cycle through the layer comps B. (This is a good way to quickly show a client all of your page designs in a single file.)

CAUTION

Viewing Layer Comps. Don't make the mistake of trying to view a layer comp by clicking on the layer comp in the Layer Comps palette. That just selects the layer comp for editing. To view a layer comp in the document window, click in the Apply Layer Comp field to the left of the layer comp.

If one of the designs does not look as expected, click on its layer comp in the Layer Comps palette to select that layer comp C. Edit the image. Then click the Update Layer Comp icon at the bottom of the Layer Comps palette D. When you're satisfied, choose File>Save As to save the image with all of its layer comps.


CAUTION

Nonreversible Edits. If you make a nonreversible change to an image (like deleting a layer, merging layers, or changing image modes) you'll see a yellow triangle in the layer comps affected by that change. You have three options:
  • Update the layer comps by selecting each one and clicking the Update Layer Comp icon at the bottom of the Layer Comps palette.
  • Control/right-click the warning icons and choose a removal option. This deletes the warnings. However, it can result in unexpected changes to the layer comps.
  • Open the History palette (Window>History) and choose a previous history state to undo the nonreversible changes.
10.
Slice the Home Page Layer Comp

Now you'll begin slicing up the image, so that each of the navigation graphics (the text links, markers, and buttons) can be saved as a separate GIF or JPEG. This will allow you to assign a separate URL link to each navigation graphic in a Web site–building program like Dreamweaver or GoLive. You'll start by slicing the home page, which has different navigation graphics than the other three pages.

Click in the Apply Layer Comp field to the left of the Home layer comp A to display that layer comp in the document window. In the Layers palette, click the arrow to the left of the TextLinks layer set to open that layer set. Click on the Link1 layer; then hold down the Shift key and click on the Link4 layer to select all the text link layers B. Choose Layer>New Layer Based Slices from the menu bar at the top of the screen to create a separate slice around each of the text links C.


Now select the HuesMarker layer in the Layers palette. Hold down the Shift key and click on the ShadesMarker layer. This selects the three marker layers D. Choose Layer>New Layer Based Slices from the menu bar to create slices around each of the navigation markers in the top navigation bar E.
 

Create Slice Set 1

Open the Web Content palette (Window>Web Content), where you'll see all of the slices you just made. Click on the top slice in the palette; then hold the Shift key and click on the bottom slice to select all the slices. Click the Create New Slice Set button at the bottom of the Web Content palette A. This creates Slice Set 1 B which contains all of the slices indented beneath it.

INSIGHT

Slice Sets and Layer Comps. Slice sets are designed to be used in conjunction with layer comps. A slice set is a collection of slices that can be applied to multiple layer comps. This means that if you have several layer comps that have the same structure (like the three inner pages In this project) you can slice just one of those layer comps, save the result as a slice set, and use that same slice set to automatically slice the other similar pages.
Slice the Colors Layer Comp

Now you'll slice the buttons that appear only on the inner pages. Click in the Apply Layer Comp field to the left of the Colors layer comp A. In the Layers palette, open the Buttons layer set. Shift-click to select the four button layers B. Choose Layer>New Layer Based Slices from the menu bar at the top of the screen to create four button slices C.
 
Make Another Slice Set

In the Web Content palette, Shift-click to select all the button slices. Click the Create New Slice Set icon at the bottom of the Web Content palette to create Slice Set 2 A, which contains only the button slices. You don't have to slice any of the other pages you've designed!
Save Each Page

We've already optimized for you, so you can go ahead and save each layer comp using the relevant slice sets. You'll start by saving the Colors layer comp. Make sure both slice sets display an Eye icon in the Web Content palette A, B. Click the Apply Layer Comp icon on the Colors layer comp. Choose File/Save Optimized As. Then set Format/Save As Type to HTML and Images. Make a new folder for the colors page output, and click Save. Repeat this step for the Hues and the Shades layer comps, making a separate output folder for each.
 
Turn off the Eye icon on Slice Set 2 C (because the home page doesn't need the button slices) and repeat this step on the Home layer comp. Choose File>Save to resave the PSD file with its slice sets.

In the output folders on your hard drive you'll find an HTML file for each page and a folder of images generated by only the slices that relate to that page. Open each HTML page in a Web browser to admire your work.
In this tutorial:
  1. Automation
  2. Batch Processing Photo Thumbnails
  3. Making the Most of Actions
  4. Making Multiple Web Graphics
  5. Demystifying Droplets
  6. Preparing Photos for Web with Conditional Actions
  7. Design Multiple Pages in a Single File
  8. Linking HTML Pages from Layer Comps
  9. Outputting Multiple Linked Web Pages
  10. Creating Dynamic Flash Web Banners
  11. Creating and Importing External Data Sets