Make sure that the background is converted to layer if it isn’t already. To do that, double click the background name in the layers palette and accept the name that Photoshop offers you. (Probably “layer 1”)

Choose the eraser tool
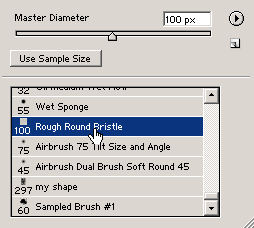
Did you know that you can use any of the brushes with the eraser tool? Well you can. Open the brushes palette and select the “Rough Round Bristle” that came with Photoshop.

Shrink the page size so that there is a fair amount of the artboard showing.

As you move the eraser over the image area, you will see the shape of the brush

Begin to “dab and drag” the edges. Work your way down from the top. Don’t just drag
the brush down the image, rather work it side to side, slowly eating away at the edges.

Keep erasing until your image looks similar to shown.

Finally, here is the image with a white background and a drop shadow applied with the layers styles.


Simple.. YUKS!
ReplyDeleteI don't have this brush...Rough Round Bristle. :/
ReplyDeletesimple but cute...
ReplyDelete