Friday, September 3, 2010

Information Site

This home page for an information site has lots of text elements. You'll use tables and CSS to organize and output text graphics and coded text for display on the Web. This project takes place in ImageReady.

1.
Decide on Graphics or HTML Text

When you're laying out a page in Photoshop or ImageReady that has lots of text, one of your first decisions is when to use text saved as a graphic and when to use HTML text. The advantage of HTML text is that it is much smaller in file size than text graphics. It can also be easier to change when you're updating a page. However, you can't guarantee what font or font size will be used to display standard HTML text at the viewer's end. If you turn your text into graphics, you can use any font and be assured of how the text will appear to your audience. However, the total size of the page will be noticeably larger. In general, graphics are the way to go for headlines, logos, and text in fancy fonts A, and HTML text makes sense for blocks of small text B. In this project, you'll learn how to prepare both kinds of text when you're laying out a page in ImageReady.

Shape the Interface

The layout of this page is simple but elegant. There are no loud graphics to compete with its main product-—information. We prepared most of the background elements by creating rectangular color blocks that organize and call attention to the text. In this step you'll set off the secondary navigation (1800s, 1900s, 2000s) by creating a tabbed navigation bar. Choose View>Rulers to turn on ImageReady's rulers. Click in the horizontal ruler and drag out a horizontal guide, positioning it at the baseline of the info site text A. Use the Move tool if you need to tweak the guide.

In the Layers palette, click the arrow on the Top Bar layer set B to reveal the contents of that layer set, and select the Bar layer. Select the Polygonal Lasso tool from behind the Rectangular Marquee tool in ImageReady's toolbox C. Hold down the Shift key (which constrains the tool to making straight lines and 45° angles). Click at the following points: the left edge of the guide, just under the e in the word site, on the top of the green bar, and at the right edge of the document. Then click around the outside of the document window to come back to the beginning of your selection D. Choose Select>Inverse, and press the Delete/Backspace key to cut out a tab shape E. Press Command/Ctrl-D to deselect.

Add Text Links

Select the Type tool in the toolbox. Choose white and a Sans Serif font in the Options bar. Type a line of text links: 1800s 1900s 2000s A. Click the checkmark on the Options bar to commit the type. Then choose a script font and create another Type layer by typing link1 link2 link3 link4 link5 B. Use the Move tool to position these two type layers as in the illustration.

Create Main Links

In this step you'll add text and bullet links to the left side of the page. Click the arrow next to the TextLeft layer set to expand that layer set A. Control/right-click the link here type layer and choose Duplicate Layer from the contextual menu. Repeat this until you have a total of six link here layers B.
Select and Distribute the Links

Now you'll select and automatically distribute the six link layers. With the link here layer selected, hold the Shift key and click on the link here copy 5 layer at the top of the layer stack A. Select the Move tool in the toolbox to display alignment and distribution buttons in the Options bar. Type 20 px in the box at the far right of the Options bar B, and click the Distribute Layer Vertical Space button C. This evenly distributes the selected layers vertically, with 20 pixels between each D. The ability to select mulTIPle layers and to specify distribution spacing are features found only in ImageReady, not Photoshop.
Now do the same thing with the BulletsLeft layer. Make five copies and Shift-click to select the six BulletsLeft layers. This time enter 12 px in the distribute box in the Options bar E and click the Distribute Layer Vertical Space button F. The bullets are now distributed evenly alongside the text G.
Complete the job by repeating Steps 4 and 5 on the text and bullet links on the right side of the pages, which you'll find in the TextRight layer set.
6.
Slice the Banner

In this step you'll create slices in the banner at the top of the page. First draw a separate slice around each of the photographs A. They merit slicing because they will optimize best in JPEG format, while the text and graphic elements in the banner will optimize best in GIF format.
Next you'll slice the text links in the banner, so that each can be assigned a separate URL link when this page is incorporated into a site in Dreamweaver or GoLive. Draw one slice around the five script links that you added to the banner B. Then chose Slices>Divide Slices in the main menu bar. In the Divide Slice dialog box, choose Divide Vertically Into and type 5 in the field labeled slices across, evenly spaced C. ImageReady automatically divides your one slice into five. You can adjust these slices by clicking on their borders with the Slice Select tool and dragging.

Finally, draw a separate slice around each word in the secondary navigation bar—1800s, 1900s, and 2000s D. Choose Slices>Divide Slices, and automatically divide it into 3 slices across, evenly spaced E.


TIP

Turn Off Snap. You may find it easier to slice with the Slice tool if you turn off the Snap feature, which attracts slices to each other and to other items on the page. Choose View>Show>Slices to disable this feature.
7.
Group Banner Slices into a Table

In this step you'll group all of the banner slices into a table. When you save this page with HTML, this table will act as a container for all of the GIFs and JPEGs produced by your banner slices.

Select the Slice Select tool in the toolbox and click on each of the slices you created in the banner (known as user slices) A. Then choose Slices>Group Slices into Table. A slice border appears around the table, along with a special table slice symbol B. Drag the borders of the table to make sure they encompass the entire banner.


View the Table Slices

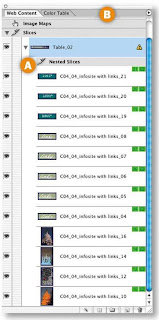
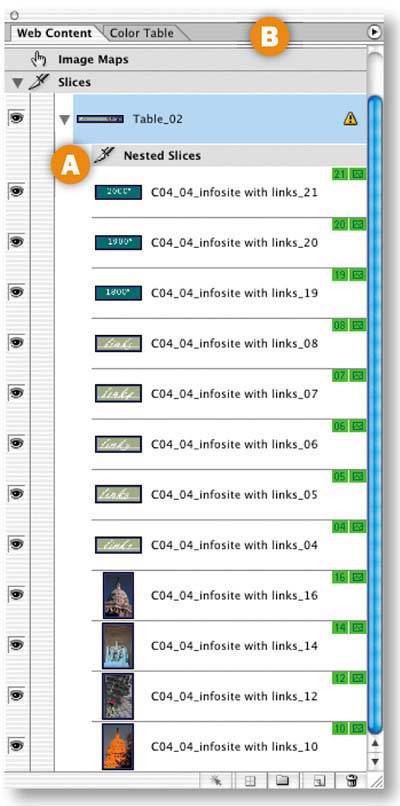
Open the Web Content palette (Window>Web Content) to view a list of all of your user slices. Notice that although you've only made one table yourself, your slices are listed under Table 02 A. That's because when you save a page from ImageReady with standard HTML, the program saves the entire document as one large table—Table 01—with each slice corresponding to a table cell. Any additional tables you create are nested inside of that larger table. That's why these slices are labeled Nested Slices in the Web Content palette.

INSIGHT

Why Make Nested Tables? Nested tables are useful for holding sections of your page layout together and in place on the page. They're also a means of creating portable modules. For example, you can take this nested table into a site-building program like Dreamweaver or GoLive and save it as a reusable component that can be easily included in other pages in a site.


INSIGHT

Yellow Warning Icon. The yellow warning icon next to Table 02 in the Web Content palette means that this slice layout contains some spacer cells that could cause gaps in the table. It can be fixed by adjusting the slice borders with the Slice Select tool. But you can ignore it for now.
9.
Slice and Make a Table of Links

Draw a slice around the top link here text link and bullet on the left side of the page A. Choose Slices>Duplicate Slice. In the Duplicate Slice dialog box, choose Below Original from the Position menu and click OK B. ImageReady makes a new slice that fits nicely around the next link and bullet C. This works because each item is the same size and they are evenly spaced. Repeat four more times to create slices around all the links on the left side of the page.
Select all six slices by clicking on one of them in the Web Content palette, holding the Shift key, and clicking on the slice at top of the stack D. Click the Group Slices into Table button at the bottom of the Web Content palette E to join the slices into another nested table F. Repeat with the link here items on the right side of the page.
Create HTML Text

In this step you'll designate a slice as one that will contain nongraphic HTML text. With the Slice tool, draw a slice around the large empty area in the middle of the page A. With that slice selected, open the Slice palette (Window>Slice). In the Slice palette, choose No Image from the Type menu B. The palette changes to display a Text box. Type or paste some text into the Text box C, and check Text is HTML D. You won't see the text in the document window, because ImageReady doesn't preview HTML text. However, you will see it shortly in a browser preview.

Color the Cell Background

The slice you created for the HTML text is a table cell, just like slices that contain graphics. In this step you'll change the background color of that table cell.

Choose the Eyedropper tool in the toolbox A and click on a light color in the image. That color appears in the Foreground Color box B. Click the arrow next to the Background section of the Slice palette to expand that section. Click in the Color field C.and choose Foreground color from the pop-up menu. This sets the color of the table cell that will display your HTML text.

TIP

Expand the Slice Palette. To see all of the options in the Slice palette, click the double-pointed arrow on the Slice tab.
12.
Preview the HTML Text

Click the Preview in Browser icon in the toolbox to view the page in your default browser. You'll see the HTML text that you entered into ImageReady's Slice palette against the colored cell background A. You can format and change the color of this HTML text when you bring this page into a site-building program.

Set the Page Background Color

Now you'll choose the color that will appear in a browser window behind your page. Select the Eyedropper tool in the toolbox and click on the dark green border of the page to set the Foreground Color. Choose File>Output Settings>Background. In the Output Settings dialog box, click the arrow on the BG Color box and choose Foreground Color A. This sets the Web page background to dark green.
Click the Preview in Browser button to view your page against this HTML background B.

Optimize the Slices

Click on the Optimized, 2-Up, or 4-Up tab A of the document window to preview your page with the slice optimization settings you choose. Select the Slice Select tool in the toolbox. Hold the Shift key and click on each of the photographs in the banner B. In the Optimize palette (Window>Optimize) C, choose JPEG as the format, and set the compression quality to Medium, striving for the lowest file size that retains the image quality you want.

Select each of the other slices in the image and optimize them as GIFs. Similar slices can be linked so that you only have to choose optimization settings one time for all of them. For example, select all of the link slices. Then choose Slices>Link for Optimization from the main menu bar.


TIP

More on Optimzing Slices. To learn more about optimizing slices, take another look at JPEG Optimization, GIF Optimization, and Slicing and Optimizing a Navigation Bar.

Don't forget that you'll need to optimize the auto slices (the ones with the gray numbers that were created automatically) as well as the user slices (the ones you created).
15.
Save as HTML

We'll show you how to save this page two ways—first with standard HTML and then with CSS (Cascading Style Sheets). ImageReady produces HTML with tables by default (unless you choose CSS instead). Choose File>Save Optimized As. In the Save Optimized As dialog box, set Format/Save as Type to HTML and Images A. Make sure the Slices menu is set to All Slices B, choose a destination, and click Save.
ImageReady generates an HTML page with nested tables to hold all your images in place, along with a folder of images that contains GIFs and JPEGs generated by each slice in the source file C. Open the HTML page in a Web browser and view the source code there. You'll see tables designated in the HTML code D.
CSS
Go back to your PSD file, which is still open in ImageReady. Choose File>Output Settings>Slices. Notice that Generate Table is selected by default. Choose Generate CSS instead A. The Referenced setting offers different ways of referencing the styles that position your slices. Leave it at its default, and click OK. Now choose File>Save Optimized As, using all the same settings covered in the preceding step.
This time ImageReady produces images and an HTML file that employs CSS styles, rather than an HTML table to hold your images in place. Open this HTML page in a Web browser and view its source code there to see the CSS code. You'll see slices listed with pixel positions B. You can take either kind of output into a site-building program or a text editor and tweak it there. Or use the output as-is in a site.

TIP

ImageReady CSS. The CSS generated by ImageReady is used to position the output from your slices, as an alternative to HTML tables.

In this tutorial:
  1. Web Site and Home Pages
  2. Getting in the Game
  3. Showing Off
  4. Getting Serious
  5. Create Game Site
  6. Applying Patterns to Web Graphics
  7. Web Pattern Recipes
  8. Gallery Site with Viewer Feedback
  9. Adding File Information to Images
  10. Customizing a Web Photo Gallery
  11. Portfolio Site
  12. Information Site
  13. Flash Splash Page

3 comments:

  1. Really informative post . Keep up it sharing .

    ReplyDelete
  2. You have a great thanks for this post shared here .

    ReplyDelete
  3. Loving the info on this website , you have done outstanding job on the blog post

    ReplyDelete