Learn how to convert your photos into Thermal Photo Effect.
Step 1: First open any image.
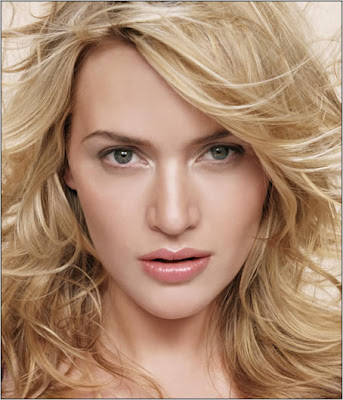
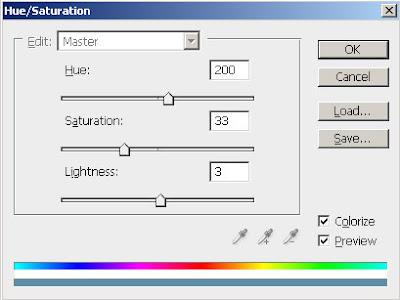
Step 2: First we apply Hue/Saturation, go to Image> Adjustments> Hue/Saturation or press Ctrl+U and apply these following setting:
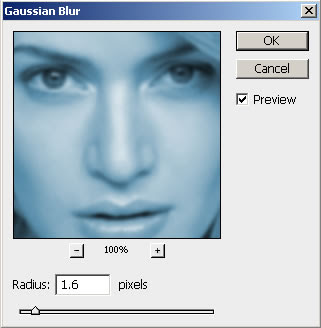
Step 3: Duplicate the layer by pressing Ctrl+J and go to Filter> Blur> Gaussian Blur and apply these settings:
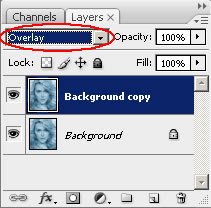
Step 4: Set the layer blending mode to 'Overlay'.
Step 5: Merge the layers together by pressing Ctrl+E. Again duplicate the layer and go to Filter> Blur> Motion Blur and apply these following setting:
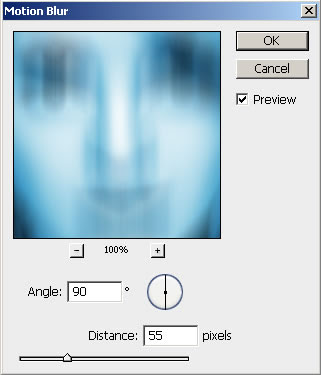
Step 6: Set the layer blending mode to 'Overlay' and merge the layer together.
After this your Image looks like this:
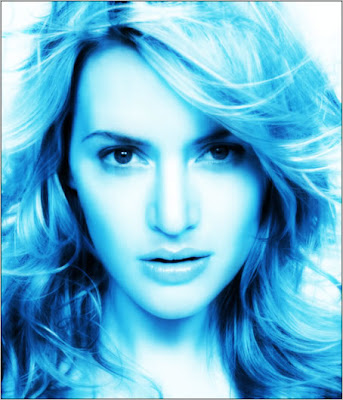
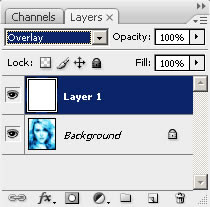
Step 7: Create a new layer and fill with white using Paint Bucket Tool.
Set this layer mode to 'Overlay' and do not merge.
Step 8: Press 'D' to reset your color palette. Set your foreground color to #000099 and background to white. Create a new layer and fill with this color (#000099).
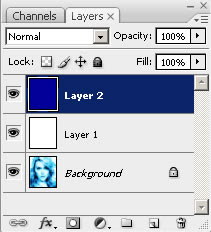
Step 9: Go to Filter> Render> Clouds. Set the layer blending mode to 'Overlay' and Opacity on this layer to 57%.
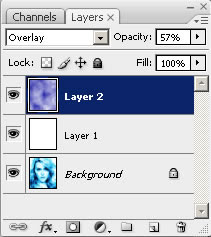
Step 10: In this step create a new layer again and fill it with white. Set the layer blending mode on this layer to 'Difference'.
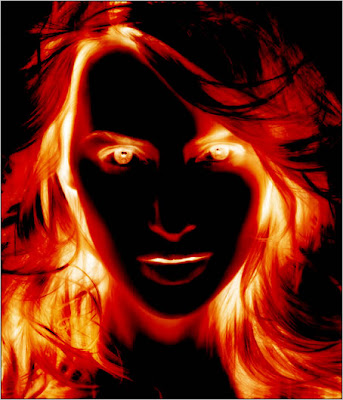
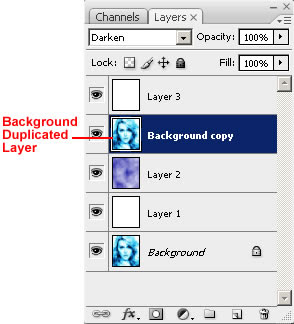
Step 11: In the Final step duplicate your background layer. Move this layer to 2nd from the top under white layer and set the layer blending mode to 'Darken'.
Here's is the Final Result!:
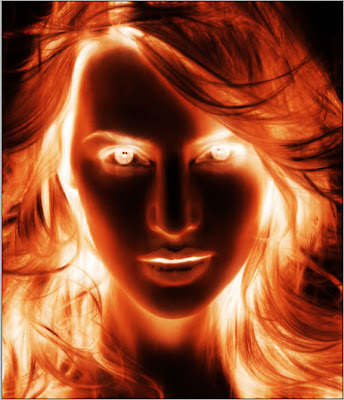


Just Amazing :) Thanks
ReplyDeletedid not work. tries 4 times with different pics
ReplyDeleteeasy step to make an amazing picture..
ReplyDeleteThis is an excellent tutorial Very easy to follow and a wonderful result. I had a go with my own face, made it a touch darker and added clouds of fire. What do you think?
ReplyDeletehttp://redandblackwallpapers.com/?p=757
Anonymous of Oct 4, 2011 - have done this with MANY images, it works but you have to remember the small parts of the steps. Colorize when you set the hue/saturation, set the blending options correctly, Remember to merge down when you should - and don't when you should not. A short summary of this would be:
ReplyDelete1) open image, CTRL+U, settings 200,33,3 check colorize.
2) CTRL+J, Filter, blur, gaussian blur set to 1.6, LAYER blending mode is Overlay.
3) CTRL+E
4) CTRL+J, Filter, blur, motion, set to 90°55px, Layer blending mode is Overlay. CTRL+E.
5) New Layer, Fill with white, Layer blending mode is overlay.
6) New Layer, Fill with #000099
7) Filter, render, clouds. layer blending mode is overlay, layer opacity is 57%.
8) new layer, fill with white, layer blending mode is Difference.
9) duplicate the background layer, move it to the 2nd from the top, set the layer blending mode to Darken.
Simply and amazing picture
ReplyDeleteits easy to follow......thanks..
ReplyDeleteReally great.
ReplyDeleteVery good Photoshop effect, Great.
ReplyDeleteStep by step tutorials are always more helpful and easy for understand . Like your useful tutorial .
ReplyDeleteAll steps are really outstanding.
ReplyDeleteclipping path | clipping path service in Usa | clipping path service | remove image background | Ghost Mannequin Service
All steps are very nice
ReplyDeleteEcommerce photo Editing Services |
Ecommerce Image Editing
WOW! awesome effect for the photo editing. Lovely post , Thank you so much for share with us. We can give you Photo restoration service, Clipping Path service, Image masking, Neck joint service, Image Retouching,Color correction, Image Shadow,Background removal and others image editing service. Thank you.
ReplyDeleteIt is quite a effective point! Really wanna express gratitude for that information you have divided. Just keep on creating this form of content. I most certainly will be your faithful subscriber. Thanks again.
ReplyDelete
ReplyDeleteThanks for your post.EasyExpressBD is one the riliable and trusted online shop.Where you can buy product and recieve with in 48hrs.
It's a nice tutorial. Thanks for sharing your photos and nice info.
ReplyDeleteThanks for sharing this post with us. It's really an amazing post. Keep posting the good work in future too.
ReplyDeleteClipping Path
Clipping Images
Stunning post with valuable information. I liked the structure of this incredible blog as they are very useful and easy to read and therefore I visit this blog regularly. Thanks a lot for posting. additionally, I have a Photoshop Clipping Path Service Site Where we provide all kinds of image editing services.
ReplyDeleteWow, very nice step by step demonstration. It is quite easy to follow. I'm also working with different image post production platform for editing the images. However, your tutorial will help in my work as well. Very good initiative. Please keep sharing more. I'll be waiting for your next tutorial. image post production
ReplyDeleteThanks a lot. It’s so helpful.
ReplyDeleteLovely product thanks for sharing the information post to keep it up.
ReplyDeleteInvitation Boxes packaging boxes manufacturers
Business Card Boxes with logo - Packhit
Good picture and great post informative website thanks for sharing.Face Mask packaging boxes manufacturers
ReplyDeletecustom custom boxes
Its good resources that you have reveled here details, thanks
ReplyDeleteGreat post I like it very much keep up the good work.
ReplyDeletebulk Holiday Party Boxes for sale
bulk custom-made Hotel Boxes
It is a very informative post thanks for sharing the information.
ReplyDeletebest Custom Invitation Packaging Boxes with logo
Wallet box packaging wholesale
Very good Photoshop resources … Great.
ReplyDeleteBackground Removal Service!
Your sports photography tips were amazing. It was very helpful. So everyone will be very helpful.
ReplyDeleteImage Masking Services
Neck joint Services
ReplyDeleteBlur Photo Editor & Blur image Background Effect on picture has many blurry image tools for blur image editing. Easy to make your photo background DSLR blur effect.
Photography is my potion, from my childhood life I am doing work in this setor. Love to write blogs on photography tips and tutorials also publish on various platforms. Last 5 years, I am working dedicatedly in this industry. Here I would like to share my Professional knowledge which has proper guidelines to enhance my newbie photography career. Thank you
ReplyDeletePhotography is my passion, from my childhood life I am doing work in this sector. Love to write blogs on photography tips and tutorials also publish on various platforms. Last 4 years, I am working dedicatedly in this industry. Here I would like to share my Professional knowledge which has proper guidelines to enhance my newbie photography career.
ReplyDeletesmm panel
ReplyDeleteSmm Panel
iş ilanları
instagram takipçi satın al
hirdavatciburada.com
BEYAZESYATEKNİKSERVİSİ.COM.TR
servis
tiktok jeton hilesi
This comment has been removed by the author.
ReplyDeleteAmazing photo editing tips...really nice and helpful
ReplyDeleteWow, that food looks so delicious and yummy. As soon as I saw the photo of the food, I couldn't resist biting my tongue. The editing work along with the capture is very good. Is that the camera you used to capture the image? In addition, I am also using an image post-production platform for editing kind of stuff. Anyways, thanks for sharing; I would appreciate if you posted more. I will definitely return to your blog in the future.
ReplyDeleteGood content. You write beautiful things.
ReplyDeletehacklink
vbet
sportsbet
mrbahis
mrbahis
hacklink
sportsbet
korsan taksi
taksi
The thermal effect of a person or object is the difference in temperature between its surface and its core.
ReplyDeleteVisit Here: cutout image
Great information, we have started adopting these tips. Really useful.
ReplyDeletephotoshop services
Old Photo Restoration Services
Professional Photo Manipulation Services
Background Removal Services
Body Retouching & Reshaping
Thank you.
salt likit
ReplyDeletesalt likit
4880BK
Wow, this tutorial was really helpful to me. I was trying to do this until I read this tutorial, but I wasn't able to understand it. Now that I've read it, I understand.
ReplyDeleteVisit this post to learn more: Background Removal Services
Nice tutorial , its' really helpful .
ReplyDeleteIts best resources that i got here in details, this is a actual information
ReplyDeleteشركة تسليك مجاري في خورفكان P8Ne3RBlMt
ReplyDeleteThe thermal effect concepts here are truly inspiring—such a great blend of creativity and innovation! For polished visuals, check out this Our web; www.clippingpathcenter.com/ to bring your ideas to life!
ReplyDeleteIf you're thinking about visiting India, make sure catching the sunrise at the Taj Mahal is at the top of your list! It's truly a magical experience, especially as part of a well-planned Golden Triangle trip. We recommend checking out our 3 Day Delhi Agra Jaipur Tour with Taj Voyages Tour to make your journey even more memorable.
ReplyDeleteThere are plenty of other packages too!
Golden Triangle Tour With Ranthambore | Golden Triangle With Ajmer & Pushkar | Golden Triangle with Haridwar Tour
Feel free to reach out — let’s work together to plan your perfect adventure in India!
Nice explanation of the thermal effect. The examples and visuals make a tricky concept a lot easier to follow. Jewelry Retouching Service
ReplyDeleteWho we are. My Satya Travels is a trusted travel agency that provides quality car rental services and tour packages throughout the northern regions of India. At My Satya Travels we deliver safe, comfortable, and low-cost travel options utilizing only professional drivers operating safe and reliable vehicles.
ReplyDeleteIf you’re planning on going to Mathura Vrindavan, Agra for sightseeing, Delhi, or the Golden Triangle we guarantee that you will have a successful travel experience with us, and we will satisfy your travel needs.