Friday, September 3, 2010

Flash Splash Page

We'll finish up with a big splash. You'll make a splash page for a Web site that includes a Flash animation that tests whether a viewer has the Flash player installed on her computer.

1.
Start with a Splash

Many sites use a splash page as the gateway to the site. This splash page is all that an introductory page should be. It uses animation to catch viewers' attention, and a sexy three–dimensional graphic to entice them to delve further into the site. Most importantly, it serves a real purpose. This splash page offers viewers a test of whether they have the Flash Player—which is necessary to enjoy a Flash-based Web site-. And if they don't, there's a quick link to download the player.

We used Photoshop to make the dimensional graphic for this page. You'll work in ImageReady to animate the graphic and export it as a Flash movie.


TIP

Flash Capability in ImageReady. In case you started reading from the back of the book (we've been known to do it ourselves), we want to be sure you know that you can export movies in Flash format straight from ImageReady. You can also export ImageReady layers as individual Flash files for import into Flash, and you can create Flash movies with variables and dynamic data in ImageReady.
2.
Transform the Ball

You'll be amazed at how easy it is to make layered artwork for an animation of a sphere pulsing. In the Layers palette, double-click the layer name on the Ball layer and rename that layer Ball1 to correspond to the animation frame on which it will be first visible. Then Control/right-click the Ball1 layer, choose Duplicate Layer from the pop-up menu, and name the duplicate layer Ball2.

Click in the Visibility field of the Ball1 layer to turn its Eye icon off A, and click in the Visibility field of the Ball2 layer to turn its Eye icon on B. With the Ball2 layer selected, choose Edit>Transform>Scale. Hold the Alt/Option key as you click on the center anchor point at the top of the bounding box C.and drag down to compress the height of the ball from the top and bottom. If you want to be precise, keep your eye on the Height field in the Options bar, dragging down until the original number there (173 px) is reduced to 149 px. D. Click the big checkmark on the Options bar E to exit transform mode.

TIP

Turn Off Layer Edges. ImageReady displays a blue line around the content of a selected layer. If you find that distracting, choose View>Show>Layer Edges to toggle that option off.
3.
Transform Another Ball

Repeat the preceding step, duplicating Ball1 and naming the duplicate layer Ball3. Turn off the visibility of the Ball1 and Ball2 layers and turn on the visibility of the Ball3 layer. Compress Ball3 more than Ball2 by Option/Alt-dragging the center anchor point at the top of its transform bounding box down until the Height field in the Options bar reads 107 px.


Make Frame 1 of the Animation

Now that you've made the layered artwork, you're ready to create the animation in ImageReady. This simple animation is made by clicking in the Visibility field of each ball layer to turn its Eye icon on or off on each frame.
Open the Animation palette, which automatically displays Frame 1 A. In the Layers palette, set the layer visibility as follows B:

Ball1 layer on
Ball2 layer off
Ball3 layer off


Make Frame 2 of the Animation

Click the Duplicate Animation Frame icon A at the bottom of the Animation palette to create Frame 2. With Frame 2 selected, set layer visibility as follows:

Ball2 layer on
Ball1 layer off
Ball3 layer off
Make Frame 3 of the Animation

Click the Duplicate Animation Frame icon at the bottom of the Animation palette to create Frame 3. With Frame 3 selected, set layer visibility as follows A:

Ball3 layer on
Ball1 layer off
Ball2 layer off
Make Frame 4 of the Animation

Click the Duplicate Animation Frame icon A at the bottom of the Animation palette to create Frame 4. With Frame 4 selected, set layer visibility as follows B:

Ball2 layer on
Ball1 layer off
Ball3 layer off
Set the Animation Time Delay

In this step you'll set the time delay between frames. With Frame 4 highlighted in the Animation palette, hold the Shift key and click on Frame 1 to select all the frames. Click the Time Delay label under any frame A and choose 0.2 sec.
Click the Play arrow B at the bottom of the Animation palette to preview the animation in ImageReady. Click the same button to stop the preview. Sweet!
9.
Add Text

Select the Type tool in the toolbox, and choose white and a Sans Serif font in the Options bar. Type: To enjoy this site you will need to have Flash® Player installed. Use the Move tool to move the text into place under the ball A. (Selecting the Move tool also commits the type and exits text edit mode, so you're ready to add another type layer.)

Type: If you see a ball moving in the center of the page click HERE Press Return/Enter, and type: Otherwise, get Flash® Player HERE

Highlight the last two lines of text, and click the Align Text Right icon in the Options bar. Use the Move tool to move this text into place at the bottom-right corner of the image B.


Make Image Map Hot Spots

Select the Image Map Rectangle tool in the toolbox A. Drag rectangular hot spots around each of the two words HERE. Select a hot spot with the Image Map Select tool B. In the URL field of the Image Map palette C.(Window>Image Map) add a relative link (like contact.htm) to a page you plan to add to the site. For the second hot spot add a full link (including http://) to an external site where a viewer can download the Flash® Player.

TIP

Registered Trademark Symbol. To insert a registered trademark symbol, press Command-R/Alt-0174. Highlight the symbol and click the Character palette icon in the Options bar. In the Character palette, click the Superscript button.
11.
Prepare a Slice Around the Ball

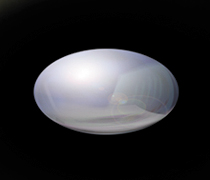
If the fully round ball is not visible, turn on the Eye icon on the Ball1 layer in the Layers palette. Select the Slice tool in the toolbox and draw a slice around the ball no bigger than its black glow A. In the Slice palette (Window>Slice), name the slice Ball B. Choose Slices>Group Slices into Table from the main menu bar. A table symbol now appears in the Ball slice C. Putting this slice alone in a nested table as you just did, rather than leaving it as a cell in a larger table, which is the default behavior, will help keep the area from collapsing in the HTML file when you remove the ball image later in this project.

Optimize the Slices

The file now contains one user slice around the ball and several auto slices that ImageReady made to fill in the surrounding area.You'll optimize these slices in this step.

Click on the Optimized tab in the document window A so you can see a preview of the image with the optimization settings you choose. Open the Optimize palette (Window>Optimize), and click the double-pointed arrow on its tab B to see all its settings. Select the Slice Select tool in the toolbox C, and click on the Ball slice in the image. In the Optimize palette, choose the following settings:
  • Format: GIF (This has to be a GIF because it's an animation. JPEG does not support animation.)
  • Reduction: Selective
  • Colors: 256
  • Dither Method: None
  • Transparency: Checked
  • Add Metadata: Unchecked
Repeat this on one of the auto slices.


TIP

Optimizing an Animation. To learn more about optimizing an animation.
13.
Set the Page Background Color

Choose File>Output Settings> Background. In the Output Settings dialog box, click in the BG Color field A and choose black (#000000) in the Color Picker that opens. Click OK in both dialog boxes. This sets the background color of the Web page that will show in a browser window that is stretched larger than this image.

Save with a GIF Animation

Choose File>Save Optimized As. Set Format/Save As Type to HTML and Images A. Click New Folder B and make a new folder in which you'll save these files. Set Slices to All Slices C. Click Save. ImageReady generates a folder of images that contains the Ball.gif animation D generated from your Ball slice. It also produces an HTML file, with a nested table to hold the animation in place.
Export ball.gif as a SWF

In ImageReady, choose File>Open and navigate to Ball.gif in the folder of images you generated in the last step. With Ball.gif open in ImageReady, Choose File>Export>Macromedia® Flash© SWF. In the SWF Export dialog box, click in the SWF bgcolor field A and choose black from the Color Picker. Uncheck Generate HTML B to save the SWF without an HTML file. Set JPEG Quality to about 50 C. (This setting will apply to the graphics in this animation.) Click OK. In the next Export dialog box, click Save to save the animation as Ball.swf D.
Replace the GIF with the SWF

In Dreamweaver or another site-building program, open the HTML file you saved in Step 14. Delete Ball.gif and substitute the Ball.swf file that you exported in the last step. The Flash animation is now incorporated in your splash page!

INSIGHT

Technique Summary. To review—you saved an HTML file that incorporates a GIF animation, and then re-exported that GIF animation as a SWF Flash movie. You can substitute the GIF animation for the SWF animation by opening the HTML file in a site-building program like Dreamweaver.
In this tutorial:
  1. Web Site and Home Pages
  2. Getting in the Game
  3. Showing Off
  4. Getting Serious
  5. Create Game Site
  6. Applying Patterns to Web Graphics
  7. Web Pattern Recipes
  8. Gallery Site with Viewer Feedback
  9. Adding File Information to Images
  10. Customizing a Web Photo Gallery
  11. Portfolio Site
  12. Information Site
  13. Flash Splash Page

3 comments: