Today's I am going to show you how to add adhesive tape to your photos.
Step 1: Open up a photo on which you want to add this taped down effect.
Place it to document which have you created in first step.

Step 2: So, we are going to rotate this picture a bit.
Go to Edit> Free Transform (shortcut key of 'Free Transfort Ctrl+T').

Step 3: We will make a tape. First create a new layer.
Then by using Rectangular Marquee Tool make a selection.
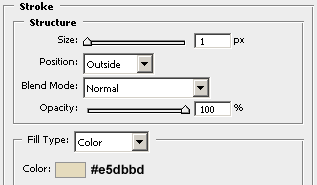
Fill it with white and press Ctrl+D for deselect the selection. Now go to Layer> Layer Style> Stroke and apply the following setting:

Now change the Fill of the layer to '40%'. After this your tape looks like:

Step 3: By using Lasso Tool make a selection like a picture shown below and press Delete.
This will add cut off effect to our tape.

Now go to Select> Deselect (Shortcut key Ctrl+D). Here's your result:

Repeat this process for the other side.

Step 4: Duplicate this layer by three times by press Ctrl+J and place each layer on different corner.
Rotate them Edit> Free Transform (Ctrl+T) so that they fit into your photo.
Here's the final result!


Thanks for the great TUT
ReplyDeletecool, thanks.
ReplyDeletetuba büyüküstün detected :)
ReplyDeleteNice, cool
ReplyDeletethank you.
ReplyDeletePhotoshop Clipping Path, Masking, Image Manipulation service provider. Free Trial, Quality guaranteed, Express Delivery, Cheap cost, 24 hrs support.
Nice tutorial that can be very helpful to do awesome design in Adobe Photoshop specially for image manipulation.
ReplyDeleteI appreciated your post amazing post . So great thanks for sharing .
ReplyDeleteHelpful tutorial. I am so benefited. Thanks
ReplyDeleteThis is really helpful tutorial. I'm so appreciate
ReplyDelete