

This interactive animation is an attention-getter designed to involve viewers with a site by giving them control over what they see. Rollover buttons trigger remote animations that change this woman's mood from happy to very, very mad.


1. | Set Up Your Workspace This is a super-project that combines remote rollovers with animations. You'll use lots of palettes at once, so start off by setting up your workspace. Go to the Window menu in the menu bar and open the Layers palette, the Web Content palette, the Animation palette, and the Optimize palette. Arrange them on your screen so you can see them all. The Web Content palette (not to be confused with the similar-looking Layers palette) is your management center. Set up the Web Content palette to display animation frames, in addition to slices and rollover states. Click the side arrow on the Web Content palette A and choose Palette Options. In the Palette Options dialog box choose Include Animation Frames B and click OK.   View the Animation Slice When you're making a remote rollover like this one, you'll need separate slices around the rollover buttons that trigger the animations and around the remote area where the animations will occur. We've already made and optimized the animation slice for you. Click on the Face slice in the Web Content palette to highlight that slice with a yellow border in the document window A. You'll make two separate animations in this slice, each triggered by a rollover button. 
| ||
3. | Slice the Rollover Buttons Start by slicing and adding an Over state to the smile button and the frown button. Fortunately, you can do both tasks on the two buttons simultaneously using a couple of shortcuts. First, select both the SmileBtn and FrownBtn layers in the Layers palette by clicking on one of them and holding the Shift key while clicking on the other A. Now click the Create Layer-Based Rollover icon at the bottom of the Web Content palette B. This causes ImageReady to create a separate layer-based slice around each of the two buttons.   View the Slices and Over States You can see the two slices you just made in the image A. and they are listed in the Web Content palette. Each slice in the Web Content palette has an arrow on its left side B that opens a list of the rollover states for th2at slice. Each of the two new button slices has an Over state listed beneath it C. When you add animation frames to a rollover state, it will be listed under that rollover state. You can think of the Web Content palette as a visual outline of the interactivity features in the image.   Name the Button Slices Your button slices have default names assigned automatically by the program. Give each of these two slices more meaningful names by double-clicking their default names in the Web Content palette and typing SmileBtn and FrownBtn respectively. These names will be incorporated into the names of the GIF files generated by these slices.  Add an Effect on the Over States The Over states you just made for the two rollover buttons are copies of the Normal state of each button (the way the button will look when the page first loads in a Web browser). Now you'll change the appearance of those buttons on their Over states. Select the Over state of the SmileBtn slice in the Web Content palette A. Then go to the Layers palette and select the SmileBtn layer B. Click the f icon at the bottom of the Layers palette C and choose Outer Glow from the pop-up menu. The Layer Style dialog box opens offering options for the Outer Glow style. Click OK to accept the default options. The smile button now has a glow on its over state. Repeat the preceding step with the FrownBtn slice, selecting its Over state and adding an Outer Glow effect to the FrownBtn layer on that state. 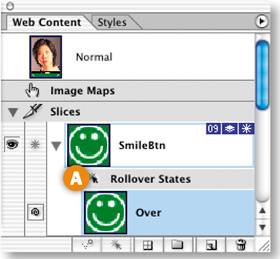   
| ||
7. | Preview the Rollover Effects Click the Slice Visibility button in the toolbox A to make the slices temporarily invisible so you have a clearer view of the image. Click the Preview button in the toolbox B. Move your cursor over the frown button in the image. It will display a glow. Move your mouse away and the glow disappears. Now mouse over the smile button, which behaves the same way.   Exit Preview Mode Click the Preview button again in the toolbox to exit Preview Mode. It's easy to forget to do this. You'll be reminded with a warning if you try to perform more actions.  Begin the Frown Animation Now things get a little more complicated. You'll add another rollover effect—an animation in a remote slice—to each of the two buttons. Each button will trigger a different animation. The smile button will start an animation that gradually changes the woman's face to a smile. The frown button will start an animation that changes the woman's face to a frown. Each animation ends with a surprise, as you'll see shortly. Start by selecting the Over state of the FrownBtn slice in the Web Content palette A. This is an important step because it establishes which state will trigger the frown animation to play. 
| ||
10. | Add Frown Animation Frame 2 Now add a second frame to the Frown animation. Click the Duplicate Current Frame icon at the bottom of the Web Content palette A. This creates Frame 2 of the frown animation and displays Frame 1 and Frame 2 under the Over state of the FrownBtn slice in the Web Content palette B. (If you see no frames in the Web Content palette, go back and follow the instructions in Step 1.) Frame 2 is now just a copy of Frame 1. You'll change that in the next step.  Change Frown Animation Frame 2 With Frame 2 selected in the Web Content palette, go to the Layers palette and click in the Visibility field of the Frown layer to turn on that layer's Eye icon A. The woman is now frowning.   Tween Frame 2 With Frame 2 selected, click the Tween button at the bottom of the Animation palette A. In the Tween dialog box, choose the following settings and then click OK:
 
| ||
13. | Preview the Tween Click the Play button at the bottom of the Animation palette to preview the animation in the document window. The woman's face gradually changes from one expression to the other. To stop the preview, click the Stop button that replaces the Play button.  Add Frames 6 and 7 The frown image now appears on Frame 5. Select Frame 5 in the Web Content palette and click the Duplicate Current Frame icon at the bottom of the Web Content palette two times. This creates Frames 6 and 7 of the frown animation. Each is a copy of the frown image on Frame 5.  Change Frame 6 Select Frame 6 in the Web Content palette. Then go to the Layers palette and click in the Visibility field of the NoseFlare layer to turn on its Eye icon on Frame 6. This adds a little surprise at the end of the frown animation. The woman's nose flares briefly to emphasize her fighting mood. Click the Play button again to see this change.   Target the Remote Animation To do that, go to the Web Content palette and click on the pickwhip icon (the spiral) to the left of the Over state of the FrownBtn slice A. Drag the target line from there to the Face slice in the image B. You'll see a target symbol to the left of the Face slice in the Web Content palette.The button that triggers the frown animation is located in the FrownBtn slice. The frown animation takes place in another slice—the Face slice. That's why we call this a remote animation. You have to do one more thing to make the remote animation play on the Over state of the frown button—target the Face slice from the Over state of the FrownBtn slice.  | ||
17. | Preview in a Web Browser Click the Preview in Browser button in the toolbox to preview the frown animation in a Web browser. The animation does not start playing automatically. Move your mouse over the frown button and you'll see the frown button glow and the frown animation play. Move your mouse away; the glow is gone and the animation stops playing. Notice that the animation plays very fast. You'll fix that in the next step.  Set the Timing First, you'll slow the entire frown animation down. Click on Frame 1 in the Animation palette, hold the Shift key, and click Frame 7 to select all frames. Click the time delay pop-up menu under any of the frames and choose 0.1 seconds A. Leave the looping option set to its default of Forever B. Add some pauses Now you'll add some pauses on particular frames. In the Animation palette, click on Frame 1; then hold the Command/Ctrl key and click on Frames 5, 6, and 7 to select those four frames. Click the time delay pop-up menu under any of the selected frames and choose 0.5 seconds. Preview again in a browser to notice the change in timing. You've finished making the frown animation. Begin the Smile Animation The Smile animation is triggered by mousing over the smile button. It's constructed the same way as the frown animation—with a combination of layer visibility changes and tweening. We'll move more quickly through the following steps, since you already know the principles involved. Select the Over state of the SmileBtn slice in the Web Content palette. This is the state that will trigger the animation A. Click the Create Duplicate Current Frame button at the bottom of the Web Content palette B to create Frame 2 of the smile animation. You'll see Frame 1 and Frame 2 under the Over state of the SmileBtn slice in the Web Content palette.  Change Frame 2 With Frame 2 of the smile animation selected, go to the Layers palette and click in the Visibility field of the Smile layer to turn on its Eye icon. The woman is now smiling tentatively.   Tween Frame 2 With Frame 2 still selected, click the Tween button at the bottom of the Animation palette. In the Tween dialog box, choose Tween With: Previous Frame, Frames to Add: 3, and Parameters: Opacity, and click OK to add three tweened frames to the smile animation.   Add Frames 6 and 7 With Frame 5 selected in the Web Content palette, click the Duplicate Current Frame button at the bottom of that palette twice to create Frames 6 and 7.  Change Frame 6 Select Frame 6 of the smile animation in the Web Content palette. In the Layers palette, click in the Visibility field of the BrowRaise layer. This makes the woman's right eyebrow raise slightly near the end of the smile animation.   Target the Remote Slice In the Animation palette, click the pickwhip icon on the Over state of the SmileBtn slice A and drag to the Face slice in the image B. This targets the remote slice for the smile animation. It's important to target the remote slice for both of the rollover animations.  Set the Timing In the Animation palette, Shift-click to select all the frames. Click the time delay pop-up menu and choose 0.1 seconds A. Then Command/Ctrl-click to select only Frames 1, 5, 6, and 7, and choose 0.5 seconds from the menu B. This slows the animation down and adds a pause on the selected frames. Leave the loop option set to forever. Good job! You've completed all of the construction. Just a few finishing touches and you're done. Preview in a Browser Click the Preview in Browser button in the toolbox to preview both rollover-triggered animations. In your browser window, move your mouse over the smile button. The button glows and the smile animation begins playing. Move your mouse away and both effects stop. Now mouse over the frown button to see it glow and the frown animation play.  Optimize the Button Slices Back in ImageReady, click on the Optimized tab in the document window to see a preview of the optimized image. Click the SmileBtn slice in the Web Content palette, hold the Command/Ctrl key, and click on the FrownBtn slice. Choose the following Optimization settings for the two button slices in the Optimize palette:
| ||
29. | Reduce the Image Size Click the box at the bottom of the Optimized tab of the document window and choose Optimized Information. Despite our best efforts to optimize this file to the smallest size at which the images look good, the total file size is still quite large for the Web. The only thing left to do to reduce file size is to make the image smaller. Choose Image>Image Size. Type 40% in the Percent field, make sure Constrain Proportions is checked, and choose Quality: Bicubic Sharper.  Save Choose File>Save Optimized As. Leave Format/Save as Type set to HTML and Images, leave Slices set to All Slices, and click Save. Each slice in the image generates at least one image file. The button slices produce two GIFs each—one for the Normal state and one for the Over state A. The Face slice produces two GIF files containing animations and a GIF for the Normal state of that slice B. ImageReady also makes an HTML file for you C that contains a table that reassembles all the individual images and that includes JavaScript to make the rollovers function. Choose File>Save to resave the PSD source file with the information you've added. This has been a relatively complex project. You may have to read it through more than once to remember its concepts so that you can create your own rollover-triggered animations.  
|

great tutorial, but needs a live preview to see it working.
ReplyDeleteYour animation tutorial is needful for me .
ReplyDeleteFantastic tutorial.
ReplyDeleteIn fact, the 401k to gold IRA in the name of gold can offer great tax advantages. This is a great reason to take advantage of them. Gold IRA is fully eligible for a tax deduction that can be claimed on your federal income tax return.
ReplyDelete