Monday, August 30, 2010

Batch Processing Photo Thumbnails

If you have a life away from your computer, you'll love actions. They will seriously reduce the time you spend in front of your screen. Here you'll create an action in Photoshop to make a sepiatoned, framed, thumbnail-sized photo. You'll use that action to batch process a group of photos, creating small images that look great on a Web page.
1.
Open a Photo in Photoshop
Small copies of photographs come in handy as links to larger images in an online portfolio or as a way to display a large collection of photographs on the Web. You can imagine what a chore it would be to reduce multiple photos to thumbnail size, add a toning effect, sharpen, add a frame, and optimize each image in Web format if you had to make all those changes to one photo at a time.


INSIGHT

What are Actions? Actions are macros that record the steps you take as you process an image. Once an action is recorded, you can apply it to a single image or to multiple images using a batch process command to maximize efficiency.

Actions are great for automating any series of repetitive tasks. You can record many things you might do to prepare an image for the Web—renaming, resizing, correcting color, sharpening, applying special effects, optimizing, adding copyright information, and more. After you've worked through this project, try recording an action to fit your own Web workflow.
Fortunately, you only have to do the work once, recording your steps as an action. Then you can play the action on a batch of photos, letting Photoshop do the bulk of the work for you. Start by opening one photograph in Photoshop. You'll start with a TIFF format image.
2.
Create an Action Set
Open the Actions palette (Window>Actions). You'll see the default action set that ships with Photoshop. You should also see the HTWWeb-Actions set. If you don't, take a minute to install the HTW Presets following the instructions in the Introduction. You'll create a new action set to hold the action you're about to make.

Click the Create New Set icon at the bottom of the Actions palette A. In the New Set dialog box that opens, name the set My Actions and click OK B.

TIP

PreMade Actions. Photoshop comes with additional premade sets of actions, including frames, text effects, textures, and more. You can load any of those sets by clicking the arrow on the side of the Actions palette and choosing a set from the side menu. Click the arrow to the left of any set to see the actions it contains.
3.
Create a New Action
Click the Create New Action icon at the bottom of the Actions palette A. In the New Action dialog box that opens, name the action Photo Thumbnail and choose My Actions from the Set menu B to put the action in that set.
Click Record in the New Action palette C. Most everything you do while the red button D is active in the Actions palette is recorded as part of the Photo Thumbnail action, so try not to make mistakes. As you add steps, they will appear beneath the Photo Thumbnail action in the Actions palette.

INSIGHT

Adjustment Layers. In the next step you use an adjustment layer. Adjustment layers, which are non-pixel-based instructions for adjusting underlying layers, are almost always preferable to direct adjustments for several reasons: An adjustment layer doesn't directly change or destroy image pixels. It can be edited at any time by clicking the left thumbnail on its layer. Its opacity and blending mode can be varied. Its application can be limited by a selection, and it has a minimal impact on file size.
4.
Sepia Tone the Photo
Your Photo Thumbnail action will contain a series of commands. The first command colorizes a photo with a sepia tone. Click the Create New Adjustment Layer icon at the bottom of the Layers palette A and choose Hue/Saturation from the pop-up menu. In the Hue/Saturation dialog box, check the Colorize checkbox B. Then move the Hue slider to 42 C. Leave Preview checked D to see a live preview of the sepiatoned image in the document window. Click OK. You'll see the Make Adjustment Layer command in the Actions palette.
Resize the Image
Now you'll add another command to this action to reduce the image to thumbnail size. Choose File>Automate>Fit Image. In the Fit Image dialog box, set Width to 250 pixels and Height to 150 pixels A and click OK.


INSIGHT

Other Resizing Methods. Alternatively, you could resize multiple images using the Image Size command in the Image>Image Size dialog box or in the Save for Web window, but you'd have to choose whether to set either height or width (the other dimension is set automatically to keep the image proportions when you check Constrain Proportions). Fit Image, by contrast, allows you to specify a maximum height and width and automatically fits your images within both specified dimensions.
Fit Image is a useful way to resize when you're creating an action to run on images of different sizes or orientations. All the photos to which this action is applied will be resized so that they are proportional and don't exceed either 250 pixels wide or 150 pixels high.
6.
Sharpen
Reducing the size of an image often makes the image look soft. So the next step in this ongoing action is to sharpen the resized image.
First, it's important to select the layer at the bottom of the layer stack A by pressing Shift-Option/Alt-[, because you want to run the Unsharp Mask filter on the layer that contains image content, not on the adjustment layer. Use this shortcut so the action will work regardless of the name of the content layer.
Choose Filter>Sharpen>Unsharp Mask. In the Unsharp Mask dialog box, choose the following settings, which are typical of settings for small, low-resolution Web images: Amount: 100, Radius: 0.5 pixels, Threshold: 3 B. Check Preview C to preview the effect in the toned image.
Now choose Edit>Fade Unsharp Mask. (If you do something else first, this command will be unavailable.) In the Fade Unsharp Mask dialog box choose Luminosity from the Blending Mode pop-up menu D. This step reduces the chance that sharpening will change the color of any photos during batch processing.

Included a Nested Action
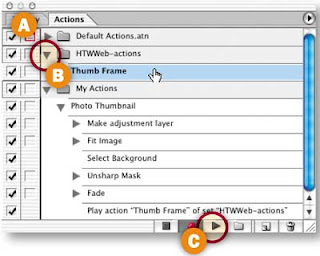
We've created another action for you that automatically draws a professional-looking frame around a small image. In this step you'll nest that Thumb Frame action inside the Photo Thumbnail action you're building. Nesting actions gets extra mileage out of an action that also can stand on its own.

With your Photo Thumbnail action still recording, click the arrow on the HTWWeb-actions action set to open that action set A. Select the Thumb Frame action in that set B; then click the Play Action button at the bottom of the Actions palette C. You'll see a frame being created around your photo, and a step labeled Play action 'Thumb Frame' of 'HTWWeb-actions' is added to your Photo Thumbnail action.
Save for Web
To complete your Photo Thumbnail action you'll optimize and save a copy of the file as a Web-ready JPEG. Choose File>Save for Web. In the Save for Web dialog box, click on the 2-up tab and select the right pane A. Set Format to JPEG and Quality to Medium B. Leave Matte set to white C. Leave the other settings at their defaults. Click Save. In the Save Optimized As dialog box that opens, leave Format/Save as Type set to Images Only, make a destination folder, and click Save. This saves a copy of one thumbnail-sized photo with sepia toning, sharpening, and a frame in JPEG format, ready to be added to a Web page.
Stop the Recording
Click on the Stop button at the bottom of the Actions palette to stop the Photo Thumbnail action recording. Then close the TIFF (the image with the transparent frame) without saving.

INSIGHT

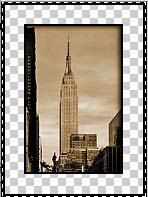
Transparency. The frame is transparent in the original view and white in the optimized view. That's because JPEG does not support transparency. In the JPEG, the transparent pixels are filled with the Matte color.
10.
Test the Action on a Single File
Open the File Browser by clicking the File Browser icon in the Options bar A or choosing File>Browse. In the File Browser, navigate to the previous tutorial Project 1 project files. Double-click on one of the images of Central Park to open it B. Select the Photo Thumbnail action, and click the Play button at the bottom of the Actions palette.
The action plays on the selected image, saving a JPEG to the destination you recorded in the action and leaving a TIFF with a transparent frame on your desktop C. Close the TIFF without saving. Open the JPEG to check it. If the action works, pat yourself on the back and skip the next step.
Troubleshoot the Action
If your action doesn't run as expected, troubleshoot one step at a time. Click the arrow at the side of the Actions palette A and choose Playback Options. In the Playback Options palette, click Pause For, type in 5 seconds, and click OK B. Open an image. Select the Photo Thumbnail action and click the Play button at the bottom of the Actions palette C to move slowly through the steps.
When you find the step with the problem, try double-clicking the step to open its command and fix what's wrong. (For example, if you saved to the wrong folder, double-click the Export step to reopen the Save for Web dialog box D, click Save, and change the destination folder in the Save Optimized As dialog box.) Or drag the step to the Trash icon at the bottom of the Actions palette to delete it, select the step just above the former step, and re-record the deleted step. If all else fails, drag the entire action to the trash and re-record, keeping in mind that a file must be open before you begin recording this action.

Save your Action Set
With the My Actions set selected A, click the side arrow on the Actions palette and choose Save Actions to save the set with your Photo Thumbnail action. The set will now be available to load from the Actions palette side menu.

TIP

Save Action Sets, Not Actions. You cannot save individual actions. You have to save the entire action set in which an action is located.
13.
Batch Process
Now you reap your reward for building the action. In the File Browser, Command/Ctrl-click the remaining four images of Central Park to select them, leaving the night shots deselected. Choose File>Automate>Batch from the file menu at the top of the File Browser—not to be confused with the File menu in the main menu bar.
Choose the following settings in the Batch dialog box:
  • Set: My Actions
  • Action: Photo Thumbnail
  • Source: File Browser (The action will run on the selected files in the File Browser.)
  • Override Action "Open" Commands: Unchecked (see Insight)
  • Include All Subfolders: Unchecked.
  • Suppress Color Profile Warnings: Checked (to avoid a warning if a file's color profile differs from your working space)
  • Destination: None (because the action contains the destination for the JPEGs)

INSIGHT

Batch from File Browser. You're running this batch process from the File Browser's File>Automate menu, rather than from the File>Automate menu in the menu bar. One advantage of batch processing from the File Browser is that in the File Browser you can select target files from various locations on your hard drive by adding a flag to each and using the File Browser Search command to search for flagged files. You don't have to manually move the files you want to process into a single folder before batch processing.


INSIGHT

Override Action Open Commands. This batch setting can be confusing. The upshot is that when you have no Open step in an action, as in this case, this box must be unchecked or no files will open. When you do have an Open step in an action, this box should be unchecked if you want your batched files to open, rather than just the original file.

Now click OK and kick back to let Photoshop apply your Thumbnail Photo action to each of the selected images. When it's done, close the TIFFs without saving and open the JPEGs from your destination folder to admire them.

You can bring these thumbnail photos into a site-building program like GoLive or Dreamweaver for inclusion in a Web site.

In this tutorial:
  1. Automation
  2. Batch Processing Photo Thumbnails
  3. Making the Most of Actions
  4. Making Multiple Web Graphics
  5. Demystifying Droplets
  6. Preparing Photos for Web with Conditional Actions
  7. Design Multiple Pages in a Single File
  8. Linking HTML Pages from Layer Comps
  9. Outputting Multiple Linked Web Pages
  10. Creating Dynamic Flash Web Banners
  11. Creating and Importing External Data Sets

1 comment: