Tuesday, August 3, 2010

Pointers and Remote Rollovers

These rollovers look great, but they're not just eye candy. Combine local rollovers that point to a link with informational remote rollovers.

1.
Design with Layers

In this project you apply both local and remote rollovers to navigation graphics, pointing your viewers to links and providing descriptions of where the links lead. The key to creating a complex rollover scheme like this one is to make ample use of layers. Take a minute to deconstruct the layers in this file to see what we mean. We've put each element involved in the rollovers-—the pointer graphics, the link graphics, the text messages, and the LCD box—on its own layer A. We've organized the layers into layer sets, and sliced and optimized the background graphics for you so you can concentrate on creating rollovers.


TIP

Slices and Rollovers. Slices and rollovers go hand in hand. Slices define the area that triggers a rollover and the areas that change with the rollover states. Layer-based slices work best for rollovers because they automatically expand to fit the largest graphic on a rollover's states.
2.
Simplify Slice Names

You'll do lots of work with slices in this project. By default, ImageReady creates long, unwieldy slice names. Change the default slice-naming convention to generate simpler names by choosing File>Output Settings>Slices to open the Output Settings dialog box. Click the arrow on the top left slice name field and choose Layer Name or Slice No. from the pop-up menu. Choose None in each of the other slice name menus and click OK.
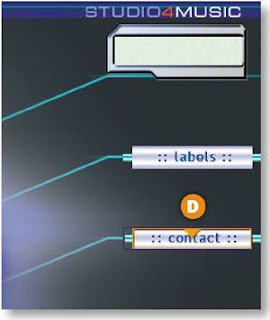
Confirm the Normal State

Select the Normal state at the top of the Web Content palette A. This is the way the page will look when it first appears in a Web browser. None of the pointers are visible and there is no text in the LCD on the top right of the page B.

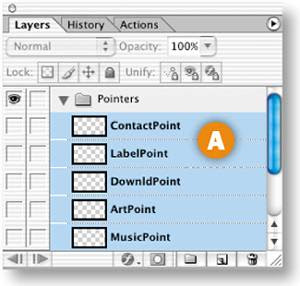
Create Layer-Based Rollovers for the Pointers

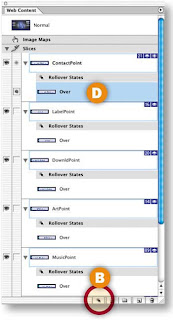
When a viewer moves his mouse over a link, a pointer will appear on that link. To create this effect, select all the pointer layers by holding the Shift key while clicking on each of the five pointer layers in the Layers palette A. Then click the Create Layer-Based Rollover icon at the bottom of the Web Content palette B. This single click creates a layer-based slice around each of the five pointers C, along with an Over state for each of those pointer slices D. All the slices and rollover states are listed in the Web Content palette. You don't see the pointers in the image because they have not yet been made visible in this state.
Make a Pointer Visible on the Over State

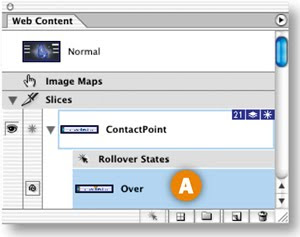
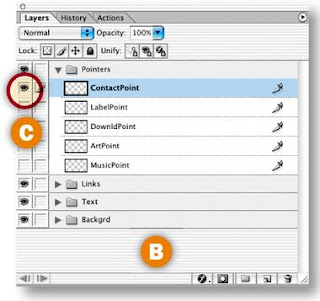
Next you'll change the appearance of the ContactPoint slice in its Over state. Select the Over state of the ContactPoint slice in the Web Content palette A. In the Layers palette, click in a blank area B to deselect all selected layers. Then click in the Visibility field to the left of the ContactPoint layer to display that layer's Eye icon C and to make that layer's contents visible in the image D. Now when a viewer mouses over the contact link in a browser, a pointer will appear on that link.
Repeat Step 5 on the Other Pointer Slices

Create a similar rollover for each of the other pointer slices—the LabelPoint slice, DownldPoint slice, ArtPoint slice, and MusicPoint slice-—by repeating Step 5. Make only the pointer layer of the same name A visible on the Over state B of each pointer slice.


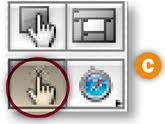
This is a good time to preview what you've done so far by clicking the Preview button in the toolbox C and moving your mouse over each link to display its pointer. Click the Preview button again to exit preview mode.
Slice the Remote Area

Next you'll add a second rollover event to the Over state of the ContactPoint slice—a text message that will appear in the LCD box at the top right of the page when a viewer mouses over the contact link in a browser. First you'll create a slice for the remote area involved in the rollover. Open the Backgrd layer set in the Layers palette and select the LCD layer A. Choose Layer>New Layer Based Slice from the menu bar to create a slice around the LCD box B.


Create a Remote Rollover

Select the Over state of the ContactPoint slice in the Web Content palette A. In the Layers palette, open the Text layer set and click in the Visibility field of the topmost text layer ("contact studio 4") to turn on that layer's Eye icon B.


Target the Remote Slice

This is the fun part! When you make a remote rollover, you have to target the slice where the remote event occurs. In the Web Content palette, press the spiral icon (the pick whip) next to the Over state of the ContactPoint slice A. Drag a line from the pickwhip to the LCD box in the image to target the LCD slice B.


TIP

Turn Off Slice Visibillity. It's useful to hide distracting slices temporarily when you preview in ImageReady. Click the Slice Visibility toggle in the toolbox to hide and show slices.
10.
Repeat Steps 8 and 9 on the Other Pointer Slices

Create a similar remote rollover for each of the other pointer slices. Repeat Steps 8 and 9 on the Over state of each pointer slice, turning on the Eye icon for the matching text layer A:
  • LabelPoint Slice: "search the record labels"
  • DownldPoint Slice: "download the newest mp3"
  • ArtPoint Slice: "search the artists"
  • MusicPoint Slice: "search the music"


TIP

Links. You can make links active in ImageReady or in a site-building program like GoLive or Dreamweaver. In ImageReady, select one of the link slices in the Web Content palette. In the Slice palette (Window>Slice) type the URL of the linked-to page in the URL field. Type the entire URL, including the http:// prefix, if you're linking to a page in another site.

Target the LCD slice each time, by clicking and dragging from the pickwhip icon next to the Over state of each pointer slice in the Web Content palette to the LCD box in the image B.
Preview in a Web Browser

Click the Preview in Browser button in the toolbox A to test the rollovers in your default Web browser. When you mouse over a link, a pointer appears on the link B, and a text message describing the link appears in the LCD box C. As you can see, these rollovers are not just eye candy. They identify which graphics are links and offer additional information about each link, making your navigation scheme user-friendly.

Save

Normally you would optimize each slice at this point. That's been done for you, so just choose File>Save Optimized As, and in the dialog box that appears choose Format: HTML and Images A. This causes ImageReady to generate an HTML file with rollover JavaScript along with image files for each state of all the rollovers on the page B. Choose File>Save to resave the PSD file with the slice and rollover data you've added.

In this tutorial:
  1. Creating Stylish, User-Friendly Navigation
  2. Critical Skills
  3. Rollovers
  4. Image Maps 
  5. Starting New File for Web 
  6. Building Navigation Bar 
  7. JPEG Optimization Settings 
  8. GIF Optimization Settings
  9. Slicing and Optimizing Navigation Bar
  10. Slice Options
  11. Transparent Buttons 
  12. Rollover Navigation 
  13. Pointers and Remote Rollovers 
  14. Image Map Navigation 

1 comment: